
Official 12 Additional Scene Files For HC-X1
Download & Installation Instructions
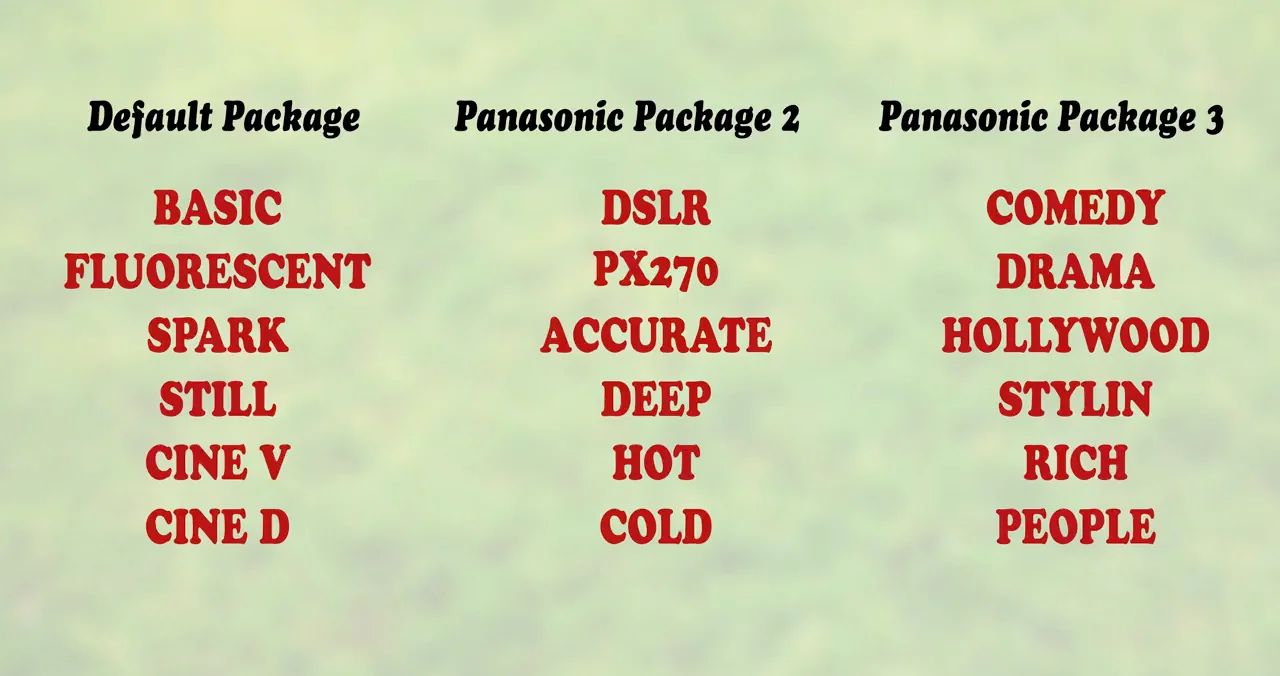
To see what each of these might look like, and to learn what scene files are, check out our previous video explaining scene files for the Panasonic HC-X1.
As you already know, the Panasonic HC-X1 and the Panasonic AG-UX180 are basically the same camera. However, if you go to Panasonic's website and try to download the UX180 scene files and use them on the HC-X1, they will NOT work.
Luckily for you, I've fixed the files (if you have a UX180 get the files from Panasonic and follow the instructions in this video or on the blog) making simple changes to the code so that it works on this camera.
From Dropbox (click Direct Download):
Download Scene File #2 (Scene2.txt)
Download Scene File #3 (Scene3.txt)
Basically if you do this right, and always have SCENE1.TXT SCENE2.TXT and SCENE3.TXT, you will always be able to have access to all 18 at all times, despite only being allowed to store 6 at a time directly in the camera.
Let's go through step by step:
How To Install New Scene Files
Create The Scene File Directory On Your SD Card
1. Put the memory card in the CAMERA
2. MENU
3. SCENE FILES
4. LOAD/SAVE
5. SAVE
6. SCNFILE1

Download The 2 New Scene File Packs
1. Put the memory card in the COMPUTER
2. Open The SD Card To The P2SD Scene File Folder
(Folder structure)
--PRIVATE
----MEIGROUP
------PAVCN
--------SBG
----------P2SD

3. Verify that "SCENE1.TXT" is already in that P2SD Folder
4. Download Scene File #2 (Scene2.txt) to Your SD Card In P2SD
5. Download Scene File #3 (Scene3.txt) to Your SD Card In P2SD
UPLOAD AN ENTIRE 6 SCENE PACK TO YOUR CAMERA
1. Put the memory card in the CAMERA
2. MENU
3. SCENE FILE
4. LOAD/SAVE
5. LOAD
6. Select SCNFILE2 or SCNFILE3 whichever you want to load
7. CLICK on F1
8. SCROLL up until you see ALL & Select That
9. Click on RETURN
10. Accept the Overwrite
UPLOAD ONE SCENE AT A TIME TO YOUR CAMERA
1. Put the memory card in the CAMERA
2. MENU
3. SCENE FILE
4. FILE SELECT (Select the ONE scene file you want to replace)
5. LOAD/SAVE
6. LOAD
7. Select SCNFILE2 or SCNFILE3 whichever has the ONE scene you want to load
8. SCROLL to find the scene name you want to import
9. Click RETURN
10. Accept the Overwrite
RESTORE DEFAULT SCENE FILES
1. MENU
2. OTHER FUNCTIONS
3. INITIAL SET
4. SCENE
5. YES
If you followed the instructions and your memory card always has the 3 txt files on it, you won't have to restore defaults. And if you do, you will always be able to replace them right away once again.

If you have any issues, or any questions please let me know in the comments.